|
How to define a volume automation procedure |
  
|
|
How to define a volume automation procedure |
|
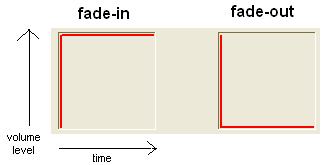
Volume automation allows you to have the volume change at given points, so that it can be softer at one point and louder at another. You can use automation for things like fade-outs and fade-ins, for controlling spikes in volume, and so on.
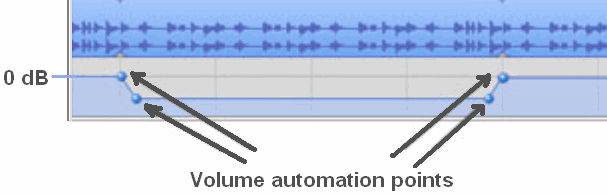
In the graphic above a volume automation sample is shown: please, note that Active Sound Editor doesn't come with an embedded graphical editor for defining parameters of volume automation points and that the graphic above is simply provided for educational purposes.
In the sample above, 4 automation points have been defined and each of them will affect how volume is applied to the sound under editing; the first two points set the start of a sliding procedure that will bring sound's volume to a softer level, the last two points sets the start of a sliding procedure that will bring sound's volume to its original value.
Volume automation can also amplify original volume level and you are free to add/remove as many automation points you need.
Each volume point inside the volume automation procedure is made up of 2 main elements:
| • | position: defines the position, expressed in the unit set into the nPositionUnit parameter of the Effects.VolumeAutomationSetScales method (milliseconds, seconds or percentage), on which a different volume will be applied to the player. |
| • | volume. defines the initial volume level, expressed in the unit set into the nScaleType parameter of the Effects.VolumeAutomationSetScales method (linear or logarithmic), applied starting from the defined position. |
In order to be effective, a volume automation procedure should have at least 2 defined volume points: the volume level set into a specific volume point reaches the volume level set into the next volume point through an automatic volume sliding: for each volume point you can define how the sliding will be performed in order to reach the volume level set into the next volume point: this is usually defined as "volume curve".
The first step to create a volume automation procedure is to start adding automation points using the Effects.VolumeAutomationPointAddNew method: each existing point can be removed using the Effects.VolumeAutomationPointRemove method or, if you need to remove all of the existing points, through the Effects.VolumeAutomationReset method.
Settings for each automation point can be retrieved through the Effects.VolumeAutomationPointGetParameters method and modified through the Effects.VolumeAutomationPointSetParameters method. The total number of available automation points can be obtained through the Effects.VolumeAutomationPointGetCount method.
A volume automation procedure can be saved inside a XML-based "VDJ" file through the Effects.VolumeAutomationSave method and retrieved at a later time using the Effects.VolumeAutomationLoad method; below you can see an example of VDJ file containing 4 volume points: this simple volume automation procedure will do the following:
| • | sets an initial volume point, named "start" at 0% of the sound's duration with volume level set to 0% (no audible sound) |
| • | during playback, the first volume point will reach the second one, named "start full" and positioned at 5% of the sound's duration, through a custom curve having a set of control points: the final volume level will be 100% (full volume) |
| • | the second volume point will reach the third volume point, named "end" and positioned at 95% of the sound's duration, without applying any volume change because the volume level between the second and third point is identical |
| • | the third volume point will reach the fourth one, named "end full" and positioned at 99% of the sound's duration, through a custom curve having a set of control points: the final volume level will be 0% (no audible sound) |
The resulting XML file has a structure like the sample below:
<?xml version="1.0" ?>
<VolumeAutomation>
<VolumePoints>
<VolumePoint name="start" VolumeLevel="0.000000" PosPerc="0.000000" CurveType="5" LeftX="3" LeftY="97" RightX="97" RightY="3" />
<VolumePoint name="start full" VolumeLevel="100.000000" PosPerc="5.000000" CurveType="0" />
<VolumePoint name="end" VolumeLevel="100.000000" PosPerc="95.000000" CurveType="5" LeftX="3" LeftY="3" RightX="97" RightY="97" />
<VolumePoint name="end full" VolumeLevel="0.000000" PosPerc="99.000000" CurveType="0" />
</VolumePoints>
</VolumeAutomation>
The main key is VolumeAutomation which contains the VolumePoints sub-key.
The VolumePoints sub-key contains a set of volume points, each one defined by the VolumePoint sub-key. Each VolumePoint sub-key contains the following attributes:
• name attribute: Friendly name of the volume point.
• VolumeLevel attribute: Volume level, expressed in percentage, applied from this point. If the original level of the volume point should have been set in dB, during a save operation performed through the Effects.VolumeAutomationSave method it would be automatically converted to percentage. Being expressed in percentage, this value would have the following effect:
| • | value 0.0 mutes the sound |
| • | values higher than 0.0 and lower than 100.0 attenuate the sound |
| • | value 100.0 keeps sound level unchanged |
| • | values higher than 100.0 amplify the sound |
• PosSec attribute: Position, expressed in seconds where the volume will be applied. This attribute can be replaced by PosMs if milliseconds are preferred or by PosPerc if percentage is preferred.
• CurveType attribute: Defines the type of curve applied to the volume in order to reach the volume level of the next volume point. Can assume the following values:
Value |
Meaning |
|
|
0 |
No curve is applied: volume will be changed immediately and will be kept till next volume point.
|
1 |
Linear curve
|
2 |
Exponential curve
|
3 |
Cosine curve
|
4 |
Smooth curve
|
5 |
Custom Bézier curve.
If this value has been defined, the following attributes will allow defining control points positions for the Bézier curve: • LeftX attribute: Horizontal position, expressed in percentage, of the left control point. • LeftY attribute: Vertical position, expressed in percentage, of the left control point. • RightX attribute: Horizontal position, expressed in percentage, of the right control point. • RightY attribute: Vertical position, expressed in percentage, of the right control point.
|
As you can see from graphs above, there are many embedded options for specifying a volume curve and the latest one is certainly the option that allows everyone finding the optimal curve for any specific need: custom curves can be designed directly inside the user interface of the container application through the Effects.CurveDesigner property which implements the CurveDesigner object: this specific object manages a windowed control, whose visual aspect can be defined programmatically, which allows designing volume curves based upon Bézier curves whose shape is defined through the manual positioning of 2 control points (displayed in cyan color on the graphic above). For further information about the use of the embedded CurveDesigner refer to the tutorial How to create custom volume curves.
VDJ format is also used by our Active DJ Studio component.
Once defined, the volume automation procedure can be applied to the sound under editing using the Effects.VolumeAutomationApply method. As for any other editing session, the edited sound can be exported into a file through the ExportToFile method.
A samples of volume automation management in Visual C++ 6 and Visual Basic 6 can be found inside the following sample installed with the product's setup package:
- VolumeAutomatiom