|
How to manage Volume Automation |
  
|
|
How to manage Volume Automation |
|
Volume automation allows having the volume change at given points, so that it can be softer at one point and louder at another. You can use automation for things like fade-outs and fade-ins, for controlling spikes in volume, and so on.

In the graphic above a volume automation sample is shown: please, note that the graphic above is simply provided for educational purposes and doesn't rely on a graphic feature available inside Audio DJ Studio.
In the sample above, 4 automation points have been defined and each of them will affect how volume is applied to the sound under editing; the first two points set the start of a sliding procedure that will bring sound's volume to a softer level, the last two points sets the start of a sliding procedure that will bring sound's volume to its original value. A defined set of volume automation points is usually defined as Volume Automation Procedure.
Audio DJ Studio can manage Volume Automation in 2 different ways:
Volume automation for single players: through the VolumeAutomation property, each allocated player (virtual deck) can have a separate volume automation procedure. The defined procedure will be applied to any song loaded inside the player and will stay alive, if not reset/modified through code, for the remaining life of the involved player.
Volume automation for playlists: a new XML-based playlist format has been defined (PDJ) which allows not only the definition of a set of sound files to play in sequence but also the definition of mixing automation facilities including volume automation procedures and cue points.
Volume automation for single players
Volume automation is implemented through a set of methods and properties of the VolumeAutomation property that implements the VolumeAutomationMan class. Through the VolumeAutomation property you can:
| • | Add/remove volume points through the VolumeAutomation.PointAdd and VolumeAutomation.PointRemove methods. |
| • | Enumerate existing volume points through the VolumeAutomation.PointGetCount and VolumeAutomation.PointGetName methods. |
| • | Save the current automation procedure into a XML-based "VDJ" file on disk through the VolumeAutomation.Save method and to retrieve and apply the same file at a later time through the VolumeAutomation.Load method. If the VDJ file should have been saved with the same pathname of an existing sound file, when loading the sound file the related VDJ file would be searched and, if available, loaded automatically: if for example the loaded sound file should be named MySong.mp3, the corresponding searched VDJ file would be named MySong.vdj |
| • | Save the current automation procedure into a XML-based memory stream, as seen above for .vdj files, through theVolumeAutomation.SaveToMemoryStream method and to retrieve and apply the same procedure at a later time through the VolumeAutomation.LoadFromMemoryStream method. |
| • | Enable/disable specific points through the VolumeAutomation.PointEnable method and to know the enabled state of a specific point through the VolumeAutomation.PointIsEnabled method. |
| • | Modify/retrieve position and parameters of a specific point through the VolumeAutomation.PointGetParams and VolumeAutomation.PointSetParams methods. |
| • | Identify the next volume point that will be executed during a playback session through the VolumeAutomation.PointGetNext method, |
| • | Check if the volume automation procedure is currently sliding playback volume through the VolumeAutomation.IsSliding method. |
| • | Reset the current volume automation procedure through the VolumeAutomation.Reset method. |
Modifications to an existing volume automation won't be immediately applied if loaded sound should be already playing and will take effect only after completing/stopping and restarting the playback session.
Each volume point inside the volume automation procedure is made up of 2 elements:
| • | position: defines the position, expressed in the unit set into the VolumeAutomation.PositionUnit property (milliseconds, seconds or percentage), on which a different volume will be applied to the player. |
| • | volume. defines the initial volume level, expressed in the unit set into the VolumeAutomation.ScaleType property (linear or logarithmic), applied starting from the defined position. |
In order to be effective, a volume automation procedure should have at least 4 defined volume points (2 for defining the fade-in sequence and 2 for defining the fade-out sequence): the volume level set into a specific volume point reaches the volume level set into the next volume point through an automatic volume sliding: for each volume point you can define how the sliding will be performed in order to reach the volume level set into the next volume point: this is usually defined as "volume curve".
As mentioned above, a volume automation procedure can be saved inside a XML-based "VDJ" file; below you can see an example of VDJ file containing 4 volume points:
<?xml version="1.0" ?>
<VolumeAutomation>
<VolumePoints>
<VolumePoint name="start" VolumeLevel="0.000000" PosPerc="0.000000" CurveType="5" LeftX="3" LeftY="97" RightX="97" RightY="3" />
<VolumePoint name="start full" VolumeLevel="100.000000" PosPerc="45.000000" CurveType="0" />
<VolumePoint name="end" VolumeLevel="100.000000" PosPerc="55.000000" CurveType="5" LeftX="3" LeftY="3" RightX="97" RightY="97" />
<VolumePoint name="end full" VolumeLevel="0.000000" PosPerc="99.000000" CurveType="0" />
</VolumePoints>
</VolumeAutomation>
The main key is VolumeAutomation which contains the VolumePoints sub-key.
The VolumePoints sub-key contains a set of volume points, each one defined by the VolumePoint sub-key. Each VolumePoint sub-key contains the following attributes:
• name attribute: Friendly name of the volume point.
• VolumeLevel attribute: Volume level, expressed in percentage, applied from this point. If the original level of the volume point should have been set in dB, during a save operation performed through the VolumeAutomation.Save method it would be automatically converted to percentage.
• PosSec attribute: Position, expressed in seconds where the volume will be applied. This attribute can be replaced by PosMs if milliseconds are preferred or by PosPerc if percentage is preferred.
• CurveType attribute: Defines the type of curve applied to the volume in order to reach the volume level of the next volume point. Can assume the following values:
Value |
Meaning |
|
|
0 |
No curve is applied: volume will be changed immediately and will be kept till next volume point.
|
1 |
Linear curve
|
2 |
Exponential curve
|
3 |
Cosine curve
|
4 |
Smooth curve
|
5 |
Custom Bézier curve.
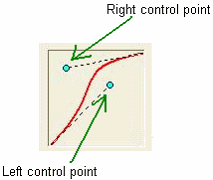
If this value has been defined, the following attributes will allow defining control points positions for the Bézier curve: • LeftX attribute: Horizontal position, expressed in percentage, of the left control point. • LeftY attribute: Vertical position, expressed in percentage, of the left control point. • RightX attribute: Horizontal position, expressed in percentage, of the right control point. • RightY attribute: Vertical position, expressed in percentage, of the right control point.
|
As you can see from graphs above, there are many embedded options for specifying a volume curve and the latest one is certainly the option that allows everyone finding the optimal curve for any specific need: custom curves can be designed directly inside the user interface of the container application through the VolumeAutomation.CurveDesigner property which implements the CurveDesignerMan class: this specific object manages a windowed control, whose visual aspect can be defined programmatically, which allows designing volume curves based upon Bézier curves whose shape is defined through the manual positioning of 2 control points (displayed in cyan color on the graphic above). For further information about the use of the embedded CurveDesigner refer to the tutorial How to create custom volume curves.
During execution of a volume automation procedure, the container application can be notified when a volume point has been reached through the VolumeAutomationPointReached event.
A samples of volume automation management in Visual C# and Visual Basic.NET can be found inside the following sample installed with the product's setup package:
- VolumeAutomatiom
Volume automation for playlists
Traditional playlist formats (M3U, PLS, WPL, etc.) are composed of file paths that point to individual titles stored inside a local sound file; furthermore, till version 3.0 of Audio DJ Studio, the programmable embedded fader allowed using playlists in order to mix contained titles using fixed fade-in and fade-out procedures based upon linear volume curves.
The new PDJ format, a XML-based list of files, allows adding more information about the way contained titles will be mixed through the use of two players; each title inside the playlist can have dedicated information about the way the mixing will be performed and about the type and duration of volume curves applied for fade-in and for fade-out operations. As a secondary feature, each playlist's item can have a set of related Cue Points.
If a PDJ playlist file already exists on your PC, you can use the PlayListLoad method but, in order to let the control recognize the PDJ format as a valid one, you need to set the nMode parameter to PLAYLIST_AUTOMATION_MODE; a call to this method won't return control to the container application until the playlist has been loaded completely so, if the playlist should be very long, it could block your user interface for a while; for this reason there is the possibility to call the PlayListLoadSync method which will perform playlist analysis and loading in a separate thread: the container application is informed about the loading advancement through the PlayListLoadStart, PlayListLoadPerc and PlayListLoadDone events; also in this case you will have to call the PlayListLoadSync method with the nMode parameter set to PLAYLIST_AUTOMATION_MODE.
In order to create a PDJ playlist from scratch, you need to call the PlayListCreatEx method and passing PLAYLIST_AUTOMATION_MODE to the nMode parameter.
Mixing and volume automation features of the PDJ format are managed at runtime through the embedded Fader which requires that all of the following conditions are met:
1. The PDJ playlist needs to be loaded into a player through the PlayListLoad method having its parameter nMode set to PLAYLIST_AUTOMATION_MODE or, in alternative, it must be created from scratch using the PlayListCreatEx method having its nMode parameter set to PLAYLIST_AUTOMATION_MODE.
2. The embedded Fader must be initialized, through its Fader.Init method, in order to use the specific player on which the PDJ playlist has been loaded/created.
3. The Fader.PlayListUseSingle method must be called with its nIndexPlayer parameter having the zero-based index of the specific player on which the PDJ playlist has been loaded/created.
For details about using the Automatic Fader refer to the How to use the Automatic Fader section.
IMPORTANT NOTE ABOUT USAGE OF VIDEO CLIPS INSIDE A PDJ PLAYLIST: When using video files in conjunction with the embedded fader and volume automation, it's recommended to set the audio rendering mode of each involved player to AUDIO_RENDERER_MODE_CUSTOM_2 through the VideoPlayer.AudioRendererModeSet method.
|
A PDJ playlist, loaded from disk or created from scratch, can be modified through the following methods:
PlayListAddItem to add one or more new songs to the playlist
PlayListAddItemWithTag to add a new song to the playlist with an associated tag string: this tag string will be reported by the PlaylistSoundLoaded event when the item is loaded into the player at runtime.
PlayListItemVolAutomPointAdd to add a new volume automation point to an existing item
PlayListItemVolAutomSetMixPos to modify mixing positions of an existing item
PlayListItemVolAutomPointRemove to remove a volume automation point from an existing item
PlayListItemCuePointAdd to add a new cue point to an existing item
PlayListItemCuePointRemove to remove a cue point from an existing item
PlayListRemoveItem to remove a song from the playlist
PlayListMoveItem to change the position of a song
PlayListGetCount to retrieve the number of songs currently in the playlist
PlayListGetItemString to retrieve information about a chosen song
PlayListSetLoop to make the playlist loop when it has been executed completely
PlayListSetShuffle to set a random playing order of the playlist songs
Once the playlist has been filled with all the needed items, volume automation points and cue points, you can save it on your PC using the PlayListSaveAutomation method. The PlayListSave method could be used as well but it will only save the list of stored songs without any information about mixing positions, volume automation and cue points.
The playlist can be executed using the Fader.StartManualFading method-
Below you can see an example of PDJ file containing 3 songs (items):
<?xml version="1.0"?>
<FaderPlayList>
<PlayListItems>
<Item pathname="C:\sounds\drumtrik01_120bpm.wav" Title="First song name" DurationSec="16.00" StartPosSec="2.0" MixPosSec="12.0" EndPosSec="16.0" >
<VolumePoints>
<VolumePoint name="start fade-in" VolumeLevelLinear="0.0" PosSec="2.0" CurveType="5"
LeftX="11" LeftY="3" RightX="93" RightY="43" />
<VolumePoint name="end fade-in" VolumeLevelLinear="100.0" PosSec="5.5" CurveType="0" />
<VolumePoint name="start fade-out" VolumeLevelLinear="100.0" PosSec="11.9" CurveType="5"
LeftX="83" LeftY="13" RightX="32" RightY="41" />
<VolumePoint name="end fade-out" VolumeLevelLinear="0.0" PosSec="15.9" CurveType="0" />
</VolumePoints>
<CuePoints>
<CuePoint name="Silence end" PosMs="1000" />
<CuePoint name="Fading point" PosMs="12000" />
<CuePoint name="Silence start" PosMs="15900" />
</CuePoints>
</Item>
<Item pathname="C:\sounds\drumtrik17_86bpm.wav" Title="Second song name" DurationSec="22.325" StartPosSec="3.0" MixPosSec="19.0" EndPosSec="22.0" >
<VolumePoints>
<VolumePoint name="start fade-in" VolumeLevelLinear="0.0" PosSec="3.1" CurveType="2" />
<VolumePoint name="end fade-in" VolumeLevelLinear="100.0" PosSec="6.5" CurveType="0" />
<VolumePoint name="start fade-out" VolumeLevelLinear="100.0" PosSec="19.0" CurveType="2" />
<VolumePoint name="end fade-out" VolumeLevelLinear="0.0" PosSec="21.9" CurveType="0" />
</VolumePoints>
<CuePoints>
<CuePoint name="Silence end" PosMs="1200" />
<CuePoint name="Fading point" PosMs="19000" />
<CuePoint name="Silence start" PosMs="21000" />
</CuePoints>
</Item>
<Item pathname="C:\sounds\drumtrik14_132bpm.wav" Title="Third song name" DurationSec="14.545" StartPosSec="0.0" MixPosSec="12.0" EndPosSec="14.0" >
<VolumePoints>
<VolumePoint name="start fade-in" VolumeLevelLinear="0.0" PosSec="0.0" CurveType="2" />
<VolumePoint name="end fade-in" VolumeLevelLinear="100.0" PosSec="3.5" CurveType="0" />
<VolumePoint name="start fade-out" VolumeLevelLinear="100.0" PosSec="12.0" CurveType="2" />
<VolumePoint name="end fade-out" VolumeLevelLinear="0.0" PosSec="14.0" CurveType="0" />
</VolumePoints>
<CuePoints>
<CuePoint name="Silence end" PosMs="200" />
<CuePoint name="Fading point" PosMs="12000" />
<CuePoint name="Silence start" PosMs="14000" />
</CuePoints>
</Item>
</PlayListItems>
</FaderPlayList>
The main key is FaderPlayList which contains the PlayListItems sub-key.
The PlayListItems sub-key contains a set of items, each one defined by the Item sub-key. Each Item sub-key contains the following attributes and sub-keys:
• pathname attribute: The absolute pathname of the sound file to play
• Title attribute: Optional string of text containing the title or a description of the sound file to play
• DecryptKey attribute: Optional decryption key for sound files encrypted through the CryptSound™ application
• NormalizationPeak attribute: Highest peak value of the sound file that will be used to speed up the loading of the file during playlist's execution when normalization has been enabled through the Effects.NormalizationEnable method.
• CustomTag attribute: custom string that will be reported to the container application through the strTag parameter of the PlaylistSoundLoaded event when the file is loaded during playlist's execution.
• DurationSec attribute: Duration of the song expressed in seconds. This attribute can be replaced by DurationMs if milliseconds are preferred as scale unit.
• StartPosSec attribute: Position, expressed in seconds, where the song will begin to play. This attribute can be replaced by StartPosMs if milliseconds are preferred or by StartPosPerc if percentage is preferred. If these attributes should be set to a negative value, the effective position will be calculated by subtracting the absolute value of the attribute from the total duration of the sound file.
• MixPosSec attribute: Position, expressed in seconds, where the mixing with the next song will begin. This attribute can be replaced by MixPosMs if milliseconds are preferred or by MixPosPerc if percentage is preferred. If these attributes should be set to a negative value, the effective position will be calculated by subtracting the absolute value of the attribute from the total duration of the sound file.
• EndPosSec attribute: Position, expressed in seconds, where the song will be stopped. This attribute can be replaced by EndPosMs if milliseconds are preferred or by EndPosPerc if percentage is preferred. If these attributes should be set to a negative value, the effective position will be calculated by subtracting the absolute value of the attribute from the total duration of the sound file.
• VolumePoints sub-key: contains the volume automation procedure applied to the current item (see below).
• CuePoints sub-key: contains cue points applied to the current item (see below).
The VolumePoints sub-key contains a set of volume points (at least 4 volume points should be available, 2 for defining the fade-in sequence and 2 for defining the fade-out sequence), each one defined by the VolumePoint sub-key. Each VolumePoint sub-key contains the following attributes:
• name attribute: Friendly name of the volume point.
• VolumeLevelLinear attribute: Volume level, expressed in percentage, applied from this point. This attribute can be replaced by VolumeLevelLog if dB are preferred.
• PosSec attribute: Position, expressed in seconds where the volume will be applied. This attribute can be replaced by PosMs if milliseconds are preferred or by PosPerc if percentage is preferred. These attributes cannot assume negative values.
• CurveType attribute: Defines the type of curve applied to the volume in order to reach the volume level of the next volume point. Can assume the following values:
Value |
Meaning |
|
|
0 |
No curve is applied: volume will be changed immediately and will be kept till next volume point.
|
1 |
Linear curve
|
2 |
Exponential curve
|
3 |
Cosine curve
|
4 |
Smooth curve
|
5 |
Custom Bézier curve.
If this value has been defined, the following attributes will allow defining control points positions for the Bézier curve: • LeftX attribute: Horizontal position, expressed in percentage, of the left control point. • LeftY attribute: Vertical position, expressed in percentage, of the left control point. • RightX attribute: Horizontal position, expressed in percentage, of the right control point. • RightY attribute: Vertical position, expressed in percentage, of the right control point.
|
The CuePoints sub-key contains a set of cue points, each one defined by the CuePoint sub-key. Each CuePoint sub-key contains the following attributes:
• name attribute: Friendly name of the cue point.
• PosSec attribute: Position, expressed in seconds where the cue point will generate a CuePointReached event. This attribute can be replaced by PosMs if milliseconds are preferred.
IMPORTANT NOTE ABOUT SYSTEM LOCALES: many attributes inside the PDJ format can have floating point values: as you may know the decimal separator can assume different values (colon or dot) depending upon the locale set into the target system. Active DJ Studio will internally convert the decimal separator used inside the attribute to the correct character set into the system locale so you won't have to worry about locale differences when redistributing a PDJ file. |